 Step 1b: Setting Up the Networked System Hardware
Follow these instructions to set up a basic access control system. Please feel free to experiment with Open Access Manager, as you can always use to get a virgin database.
Open Access Manager starts in its most simple mode. Once you have familiarised yourself, you can selectively switch on the more powerful features by changing the application options.
Connect the reader to the controller.
Connect the electric release to the controller.
Connect the supplied cable between the door controller and any RS232 serial ("COM") port on the PC (on modern PCs these are usually marked with the symbol [ 0 1 0 ]).
Plug the power supply into the door controller and the mains (line) socket, ensuring the mains supply is switched on. The LED display should become active.
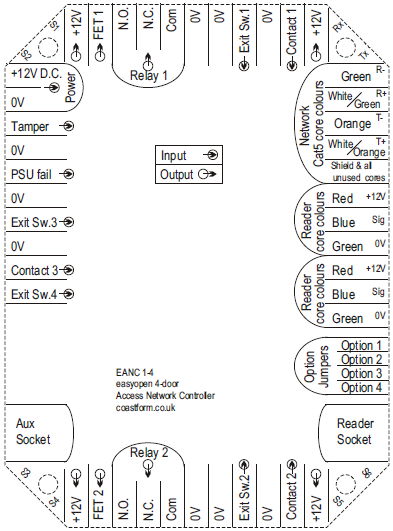
Step 1b: Setting Up the Networked System HardwareConnect the readers to the controllers as required.
Connect the electric releases to the controllers as required.
Daisy-chain the RS485 terminals on the controllers back to the RS232/RS485, USB/RS485, or Ethernet/RS485 converter. The most recent controllers are as shown right, but older controllers have slightly different labelling (Exit Sw. 3 was previously known as Input 1, Contact 3 was previously known as Input 2, and Exit Sw. 4 was previously known as Input 3).
Connect the converter to the appropriate socket on the PC, or your LAN (Ethernet/RS485 converter).
Power up the controllers.
NB: The single most common cause of a newly installed controller not being found by Access Manager is faulty wiring. Typically this is caused by one of the following:
Two cores of a multi-core cable swapped.
A wire not making contact with a terminal even though it appears to be correctly connected.
A wire which is broken or shorted somewhere along it's length (perhaps because another contractor on site has drilled through a newly installed cable).
Run Access Manager
Follow the instructions for the File Wizard.
Log in to the software by clicking .
Wait for the hardware to be detected.
Present the Master Tag if prompted.
The Wizard will now ask you if you would like help setting up your system. If you are a novice user it is recommended that you allow the Wizard to guide you through this by leaving ¤ Yes selected and clicking . However, even experienced users find that using the Wizard is quite simply the quickest way to setting up the basics.
If you have elected not to use the Wizard (step 10 above), you will need to do the following:
Edit the reader names (networked system). To identify the readers you will need to visit each in turn with any tag whilst monitoring activity.
Set the reader used to scan in tags when adding users.
Assign readers to doors.
The database file you created in Step 2 above contains all your access control settings; you are strongly advised to keep it backed up. Sooner or later you will find that the database has been damaged or destroyed for one reason or another (disk drive failure, human error, fire, and theft being common reasons). If you have a file server that has a proper backup strategy, it is recommended that you store your database on that server. If you don't have access to such a server, then you will need to find another way of ensuring that your database is backed up, such as using one of the CD-RW or DVD-RW drives that are now both ubiquitous and cheap.
If using an exclusive access database file, note that you can only make a backup copy of the database whilst the file isn't opened in Access Manager. If using a database server you should consult the server documentation about how to perform a backup.
Don't forget to backup any exported log files. These may be your only record of activity, as Access Manager cannot keep logging events indefinitely.